How To Install A Water Line To Your Refrigerator
Here is a step-by-step water line installation refrigerator guide. A new refrigerator with a water dispenser andice maker needs to be hooked up to a COLD water line. Usually behind where a refrigerator is installed, there will be a water valve that you can use to hook cold water to your fridge. If there is no water valve behind your fridge, you will have to run a water line to the closest cold water pipe to get your refrigerator access to water. You may have a cold water pipe either behind the wall where the fridge is or possibly in the floor under the kitchen. You will need to locate where the cold water pipe is, drill to access it, and install a water valve and flexible water tubing. This usually will take an hour and a half or so to complete. You will need a refrigerator water line installation kit, a drill, a wrench, drill bits, a screwdriver, and a water line cutter to complete this project.

NOTE: If you already have an installed cold water valve behind your refrigerator, all you will need to hook up your fridge to water is some flexible plastic water tubing going from the wall valve to the fridge water inlet valve.

Step 1 – Locate and select the COLD water pipe in the floor or wall you will be using for the fridge water line. (If you have a choice, select a vertical pipe not horizontal, as sediment can enter the fridge water line easier)
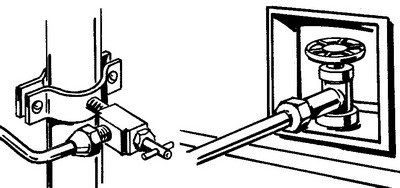
2 Types of Water Valves can be usedSaddle Valve or In Wall Water Valve for Refrigerator Water Line
Step 2 – You will be drilling a hole into the cold water pipe so turn off the main water supply to your complete house.
Step 3 – Gain access to the cold water pipe (in the wall or floor) and drill a 1/4″ hole into the pipe making sure it is as centered as possible. Make sure NOT to drill too far and make another hole out the other side of the pipe.
Step 4 – Use the water valve (saddle valve) that came with your fridge water line kit and attach it to the cold water pipe using a screwdriver and the clamps it came with.
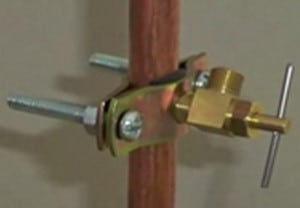
Saddle valve for refrigerator water line
Step 5 – Attach it right over the hole you drilled. Get the screws on the clamps tight enough until the sealing washer or gasket swells up. This sealing washer is what prevents water leaks so be sure it is tight enough until it swells to cover and seal the hole. Do not tighten the clamps with excessive force as you can actually distort the copper piping.
Step 6 – Get out the plastic water tubing from your fridge water line kit. Start the line from the refrigerator but do not install it onto the fridge yet. You may have to drill a hole through the wall or the floor if needed to get the other end to the water valve. Keep an extra 8 to 10 feet of water tubing rolled up neatly behind the refrigerator to allow enough tubing to be pulled out if you have to slide the refrigerator away from the wall.
Water supply line tubing for fridge
Leave extra 8 to 10 feet to allow to pull fridge out when needed
Leave extra 8 to 10 feet to allow to pull fridge out when needed
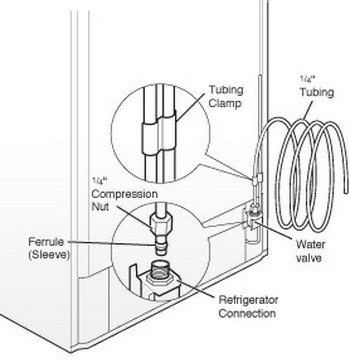
Step 7 – Put the compression nut and ferrule onto the water tubing that came with your kit. Connect the water tube to the water valve and tighten the nut with your hand, then turn once more with a wrench. Do not over tighten.
Step 8 – Now your plastic water tube should be connected to the cold water valve you just installed. You need to clear out the water tubing to get out any gunk before attaching it to your fridge. Get a large empty bucket. Put the end of the water line into the empty bucket. Turn the main water on to your home. Now, turn the new water valve on with the end of the water line in the bucket. This will flush the gunk from the tube into the bucket. Run the water line into the bucket until the water is perfectly clean and clear. Once the water is clear, turn off the new water valve.
Step 9 – Now the other end of your water tubing needs to be connected to the refrigerator. Slide on the pressure nut and then the ferrule from the water line kit onto the plastic water line then carefully attach the nut (water line) to the refrigerator water inlet valve. Do not over tighten.
Step 10 – Now it is time to check for water leaks. Turn the water on at the water valve you just installed. If you find any leaks simply tighten the nuts or the screws on the water valve only slightly until leak stops. Never over tighten.
Step 11 – If there are no leaks, plug in your refrigerator and turn the ice maker on. When the ice maker makes ice for the first 4 times, throw the ice away as it will contain debris from inside the tubing in the fridge/freezer. If you have a water dispenser on your fridge, dispense about a gallon of water and spill it down the kitchen sink drain. This is to flush the water tubing system which can have debris or dirt from the manufacturing process.
No comments:
Post a Comment